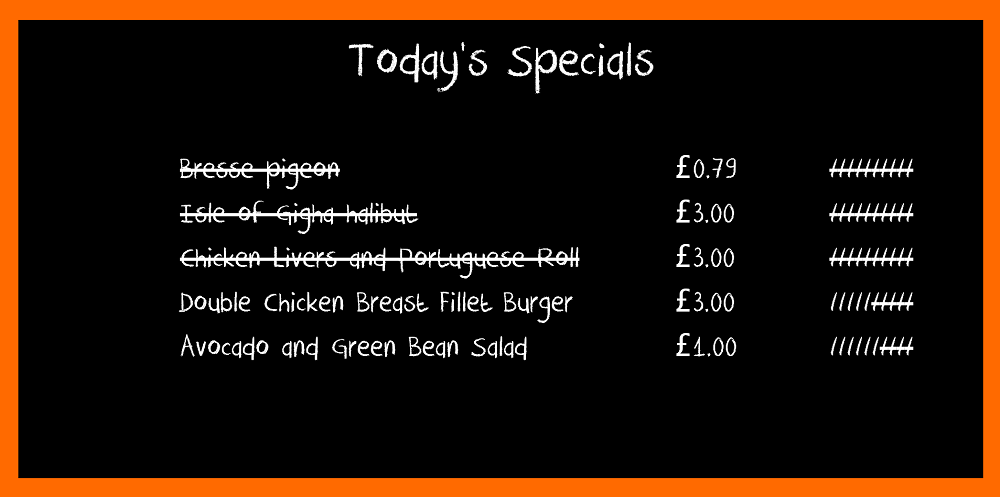
Example applications - Digital Specials Board
In this example we have chosen to create a dynamic specials board, that could be displayed on screens throughout a restaurant or similar business that sells products with limited stock.
The specification for this application is as follows:
-
Uses data accessed through the Eposnow API V1 only.
-
Allows for the selection of products from an entire product range to be displayed.
-
Shows these product names on a digital chalkboard with their price and representation of availability.
-
Automatically updates stock representation to accurately show current stock levels.
-
Visually strike out any products that are sold out.
Implementation
To develop our application we begin by creating the main page skeleton:
            <!DOCTYPE html>
                <html xmlns="http://www.w3.org/1999/xhtml">
                <head>
                <title>Specials Board</title>
                <link href="css/bootstrap.min.css" rel="stylesheet" />
                <link href="css/SepecialBoard.css" rel="stylesheet" />
                <script src="js/jquery-1.10.2.min.js"></script>
                <script src="js/bootstrap.min.js"></script>
                <script src="js/bootstrap.js"></script>
                <script src="js/SpecialScreen.js"></script>
                <script src="js/Product.js"></script>
            </head>
            <body class="frame">
                <div class="row text-center">
                    <span class="chalk_100">Today's Specials</span>
                </div>
                <div class="row text-right" style="margin-right:100px;margin-bottom:50px;" id="selectButton">
                    <a href="javascript:product.select()" class="chalk_btn">Apply Selection</a>
                </div>
                <div id="products" class="row chalk_10">
                </div>
            </body>
            </html>
This is a standard
HTML5< document which uses twitter Bootstrap to manage styling. The div with the id
products will be used as a container for our product list.
The next step is to create a simple REST API client to communicate with the EposnowHQ API.
The
self.ajax function is used to send requests to the EposnowHQ API.
In this app, we will be using the following function to retrieve a list of products and stock values.
      self.ajax = function (uri, method, data) {
        var request = {
            url: uri,
            type: method,
            contentType: "application/json",
            accepts: "application/json",
            dataType: 'json',
            data: JSON.stringify(data),
            crossDomain: true,
            beforeSend: function (xhr) {
                xhr.setRequestHeader("Authorization", "Basic " + self.API_KEY);
            },
            error: function (jqXHR) {
                console.log("ajax error " + jqXHR.status);
            }
        };
        return $.ajax(request);
    }
self.getAllProducts is a function which uses AJAX to send a
GET request to the API. This returns a list of all products.
     self.getAllProducts = function () {
        // Request all products from API
        var req = self.ajax(self.productURI, "GET");
        req.done(function (data) {
            // Store all products
            self.products = data;
            // Display products on-screen
            screen.displayProductList(data);
        });
        req.fail(function (jqXHR, textStatus) {
            console.log("Request failed: " + textStatus);
        });
    }
The next step is to implement the
SpecialsScreen function which will be used in conjunction with our
HTML5 document to display our list of products.
The code sample below shows how to display this list on the screen.
Full source code for
SpecialsScreen.js can be accessed from our Github account (link at the bottom of this page).
    self.displayProductList = function (products) {
       var pDiv = "";
        products.forEach(function (prod) {
          pDiv += ' <div class="row" >';
          pDiv += '<div class="col-md-1"></div>';
          pDiv += '<div class="col-md-1">' + prod.ProductID + '</div>';
          pDiv += '<div class="col-md-1"><input type="checkbox" class="squaredTwo" name="" value="' + prod.ProductID + '"/></div>';
          pDiv += '<div class="col-md-3">' + prod.Name + '</div>';
          pDiv += '<div class="col-md-5">' + prod.Description + '</div>';
          pDiv += '<div class="col-md-1">' + prod.SalePrice + '</div>';
          pDiv += '</div>';
       });
     $(self.productsDiv).html(pDiv);
    }
Once we have a list of products from the API, the user is able to make a selection of the products they wish to be displayed.
When the user has made this selection we need to get the stock values for each of these selected products and display them on the board.
To retrieve the stock values for each selected product we use the code:
    self.getStockForProduct = function () {
        // For all selected products
        self.specialProducts.forEach(function (prod) {
            // Request stock level from API
            self.ajax(self.stockUIR + "?ProductID=" + prod.ProductID, "GET").done(function (data) {
                if (data != null) {
                    data.forEach(function (st) {
                        // Update stock level from response
                        prod.Stock = st.CurrentStock;
                    });
                }
            });
        });
    }
We also need a function to dynamically update our board with the new stock values:
    // Method to refresh stock levels and display on screen
    self.refreshScreen = function () {
        setInterval(function () {
            // Get stock for each selected product
            self.getStockForProduct();
            // Display products on screen
            screen.displaySpecialProducts(self.specialProducts);
        }, self.screenRefreshRate * 1000); // screenRefreshRate defined in seconds, times by 1000 as milliseconds required.
    }
To initialise the app upon load of the Index page, we need to add a <script> tag to our HTML5 document, which we can use to call our getAllProducts function.
       <script type="text/javascript">
           var product = new Product();
           product.getAllProducts();
       </script>
Source Code
If you wish to view the complete source code you can do so by visiting our
EposnowHQ Github.
All of our Github source code is available for free and can be used to see our example applications from a developers perspective.
You are free to use, modify or extend all of our example applications to suit your needs.
